For most folks the challenge is that their CI system lives in some Unix environment and Selenium tests need to run on a Windows machine.To get this working I did the following
My goal was to
a)Have the test drive and report selenium tests from a single interface
b)Ability to run it on different machines with various browsers
I picked Hudson for a) for the simple reason that it’s widely used in our organization as well as it had a Selenium Grid plugin which will probably be used for accomplishing b).It’s easily available and can display JUnit reports in graphical format with drilldown capabilities.In short the works and then some:)
Tools used are :Hudson,Selenium RC 1.0.1,FF 3.5,Ant 1.7,Selenium Grid plugin for hudson,Java,TestNG,SVN,Windows XP,Hudson JUnit plugin
Note:Selenium Grid is only introduced to run the tests on multiple machines and different browsers.If this is what you don’t need,you can avoid one more layer of complexity
Step 1
This step is crucial and can differ from org to org,but if your hudson master and slave are in same subnet this should generally work.Make sure of this by pinging each host to other.If not you might need to get help from your IT such that the master hudson can ping the slave hudson and viceversa.
Step 2 (skip if not running on multiple machines)
Install Selenium Grid plugin from Manage Hudson->Plugins->Install
Hudson restart will be required
Step 3
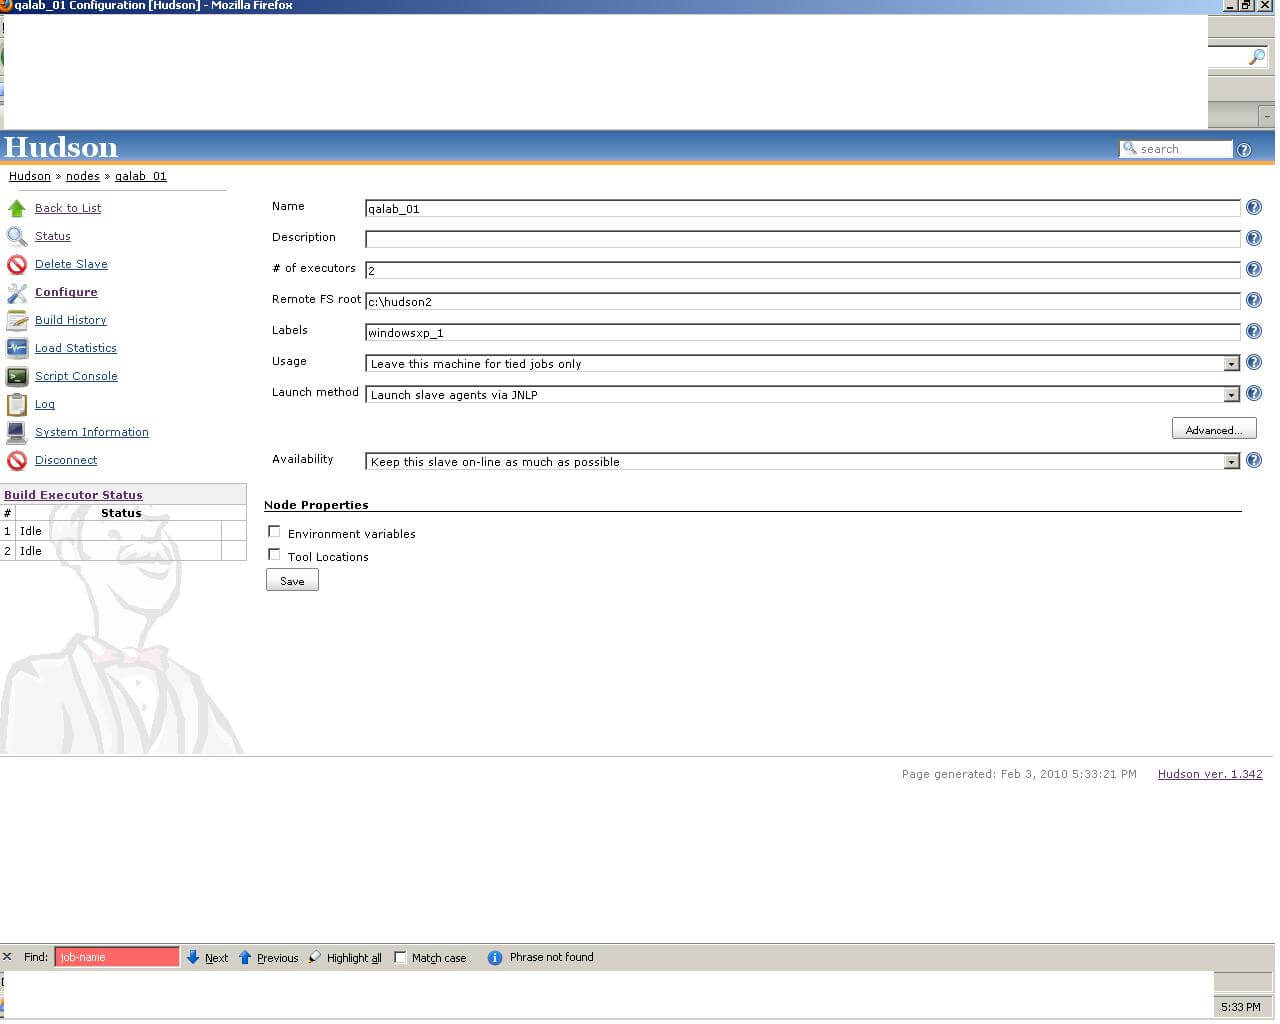
Create Hudson slave using following method
a)Go to Manage Hudson->Manage Nodes->Add Node(Dumb Slave)
b) Enter in Name field anything you wish.However hudson recommends giving same name as the host name of slave.So give the computer name of your windows machine where the tests will run
c)Num of executors is directly corresponding to number of RC’s you will run.For now keep it 1.If you want to run two browsers(e.g FF 3.5 and IE 7) this number needs to be bumped upto 2
d)Remote FS Root:c:\hudson (this is where hudson Workspace artifacts will be stored if needed).If you are going to use Selenium Grid plugin to run,you won’t need this
e)Labels:Give a unique label e.g(windowsxp_1).You will see it’s use later with Selenium Grid
f)Usage:Leave this machine for tied jobs only
g)Launch slave agents via JNLP
h)Availability keep this machines as much online as possible
Rest of the options keep blank.
Repeat the process for each Slave machine,but to keep things simple let’s just configure 1 machine at a time
Step 4
Go to the Slave machine and
a)Open your browser and point to Hudson Master
b)Go to the Manage Nodes page and you should see a launch JNLP jar icon.Click on it and it should start the process of downloading “remoting.jar” from Hudson Master(I had trouble with this and found out that somehow hudson master didn’t have the jar file at a specific location.With the help of my Hudson admin,I was able to copy this jar correctly).So if you repeatedly fail to launch the slave agent,first thing to check would be the location of remoting.jar.Also look at the java exception and it will give you clues in what could have gone wrong.
c)If all goes well you should see a small window with Hudson icon showing the message “Connected”.
The above step is very important and needs to happen in order to Hudson run selenium tests.If this doesn’t work look into hudson logs,slave logs found on hudson server and there should be some clue on what’s going on.
Step 5
Create a new job on hudson and the configure the option to “run it on the slave node” that you just created.
Publish the Junit report by pointing to the output directory xml file.This will be something like c:\hudson\workspace\xx\xx.xml
Depending on what your hudson job is doing the slave machine should have appropriate software.E.g if you are going to run ANT files,the slave machine needs to have ANT properly configured.Same thing goes with SVN.Essentially everything that your job would need to run on master should be available on slave as well.
Step 6
Start a selenium server on the slave machine as you would if it was your local machine.For this testing make sure that versions of browser that you used for your environment to run selenium test locally is same.This will eliminate unnecessary issues that are not due to this setup but browser configuration issues.
Step 7
Run the hudson job from your master and you should see the browser window popping up on the slave and running the tests.
The above should accomplish the task of running your Selenium tests on a single Windows machine.However many times you would need to run your tests in parallel as well as to optimize hardware use,make sure that Hudson can trigger test on same machine with different browser and report results back.In order to accomplish this we will use the Selenium Grid plugin which I will cover in next part if folks are interested.
Some resources that were helpful to me in this exercise were
Amit Easow’s writeup on Hudson integration


