Using JIRA as test management tool

Today, Jira has become an integral part of corporate life. In our day-to-day life as a QA, we do our issue and project tracking on Jira. Currently, Jira is the number one software development tool used by agile teams, and as agile adoption continues to grow, more and more organizations are introducing JIRA. But what about test management? We usually use the third party tools for test management and most of them are paid once. But why go for third party tools if we can create an efficient test management system in Jira itself.
What do we expect from a test management tool?
An ideal test management tool should provide features like creating projects, assigning roles and responsibilities to different users, test plan creation, test case creation, report generation, etc. Test management tools save the time of testers in the testing process and also streamline the testing process.
Also read: Alternative Of “REST/SOAP” As “GraphQL” Api In Magento 2.3
How Test Management can be done with Jira?
In order to create a test management system, user has to follow the following steps –
- Project creation – Jira provides us many customizable features, by using which we can create a project which is truly dedicated towards test management. In order to achieve this, the first thing that we need to do is create a new project for test management.
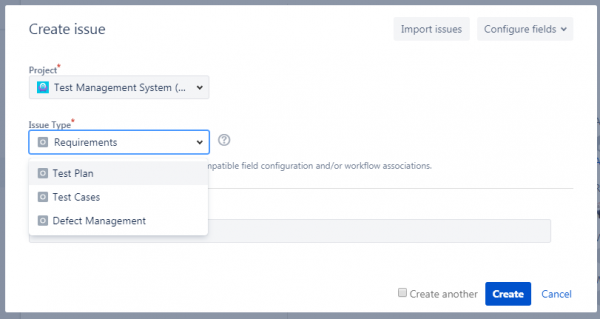
- Issue type creation – Here we have to decide the test management features that we want to include in our project, ex: Requirement list, Test cases, Test plan, Defect management, etc. These are the most important features of any test management tool which can be created as issues types in Jira. According to the required number of features we can create respective issue types for each feature.

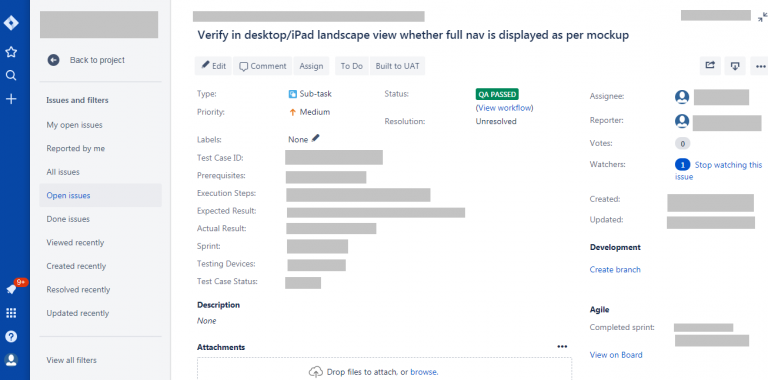
- Screen creation – Jira provides us a feature to design our own screen by selecting the fields as per our requirement. By using this we can create a separate screen for each feature which in turn are issue types in our case. In case, the fields that we want to display on our screen is by default not available, then Jira also provides us the option to create our custom field. So now we can create a test case screen in its original format with all the required parameters ex: test id, test summary, steps, expected result, actual result, status, etc. Example of test case screen is shown below. Similarly, we can create a customized screen for each feature. Then we simply need to associate these screens with our project.

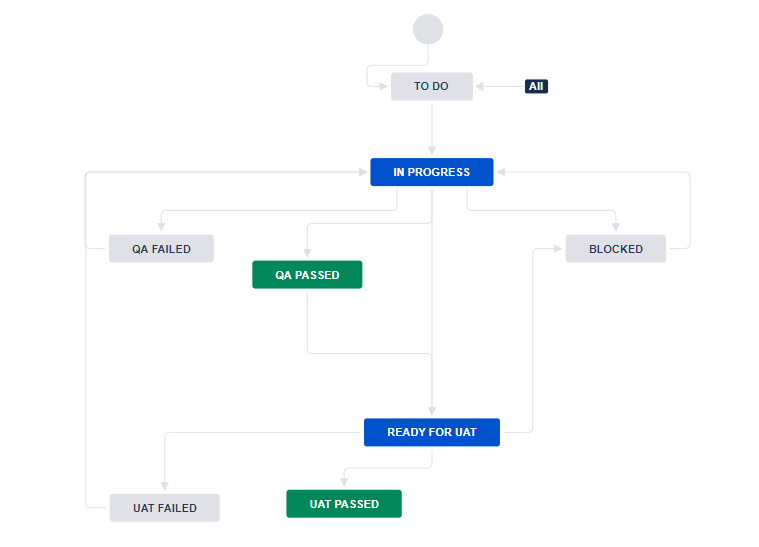
- Work Flow – We can also create a separate workflow for each feature (Issue Type) and associate it with the project. By using this, same project will be able to work according to multiple workflows, each workflow for respective feature. In our case, all the features like requirements, test plan, test case and defect management will be having a separate workflow. This is how each feature will work according to its specified workflow and can give us required results. Example of test case workflow is shown below. Similarly, we can create workflows for all the features.

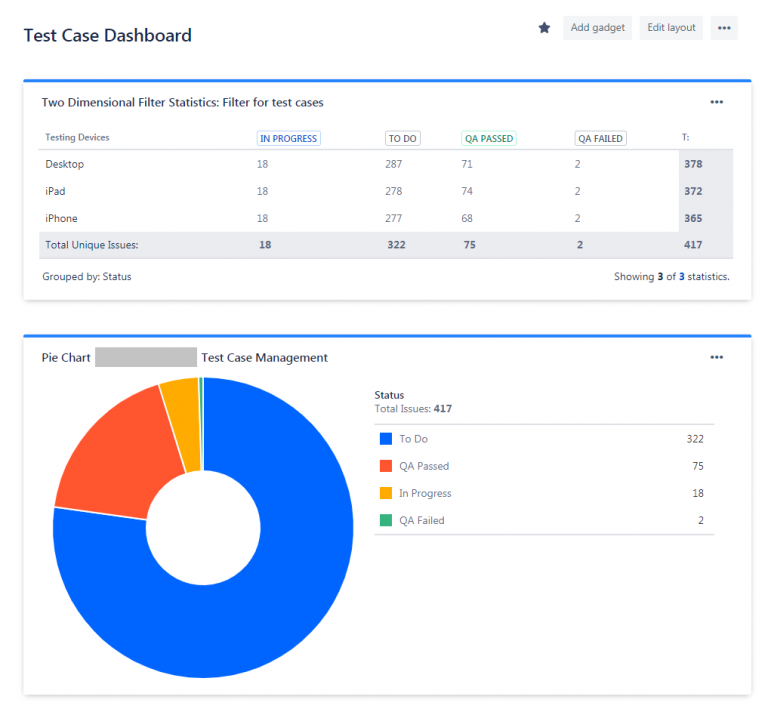
- Report creation – Report creation can be done in different formats on the dashboard ex: pie chart, statistical format, etc. Each and every field which is present on the screen can be mapped onto the dashboard to show desired results. By doing this we can create an effective report for all features. Example of report created for test cases is shown below.
 By following the above steps we can create an effective and efficient test management system in Jira. This system will be capable of managing all the important test activities which QA’s has to perform for project tracking. So, next time when you will think about buying a separate test management tool for your project, just have a look at Jira!!!!
Contact us to learn more about jira test management tool features, jira test management tool price and other best test management tools available


